In this article we will talk about what constitutes greenhouse, what are his views and, most importantly, how to build it with his own hands. What materials can it be created from, how to do it correctly, where to mount it and how to heat it? Next is about it.
Greenhouse in the country: how to choose a place?
 When choosing a place for a greenhouse, you should take into account many factors. The main one is the light mode. So, the greenhouses provided for summer cottage should be placed in areas well lit by the sun. Light is necessary for fruit crops, especially in winter. If you neglect to treat the lighting, then the cultivation of light-loving crops in the winter period will become impossible. If you do not have a well-lit area at the dacha, then greenhouses can be equipped with additional sources of artificial lighting, although this will entail additional energy costs. That is, the cost of the fruits of grown crops will increase.
It should be mentioned that in the spring and summer periods other concerns may appear, as the sun will constantly illuminate the greenhouse, and because of this, the temperature in it will only rise, which will lead to wilting of the plants. And again there are extra costs for ventilation of the greenhouse in order to maintain the optimum temperature. Therefore, as soon as you have decided to make a greenhouse with your own hands, you must first determine the place of installation. In particular, the direction of the prevailing winds must also be taken into account, because this factor is especially important when installing a permanent winter greenhouse.
Did you know? The first prototypes of modern greenhouses appeared in the days of ancient Rome. Gardeners planted plants in small carts that rolled out during the day under the sunlight, and cleaned up at night in a warm room.
Types of greenhouses in the country
Having decided to get your own greenhouse, do not forget to answer the following questions:
- Why do you need a greenhouse and what are you going to grow in it?
- Will it be used in winter or only during the warm season?
- Will you install the heating devices in the greenhouse that you made yourself?
- What is the goal - to grow plants for sale or for yourself? Do you expect costs to quickly pay off?
- What size do you need a greenhouse?
Have you answered? And now let's look at the types of greenhouses that the modern market offers, so that you can choose the design that best suits all requirements.
What are the greenhouses on the design?
 The most simple and economical in constructive terms - greenhouse recessed. Perhaps the only drawback of such a structure is that when installing on clay and loamy soils, it is necessary to equip drainage and drainage systems. To create such a greenhouse in the garden with your own hands, you first need to dig a trench of arbitrary sizes. It should go from east to west. The walls of the trench should be reinforced with struts of slab or planks cut from both sides (make the side of direct sunlight a little higher). On the sides of the recess, you must sow the seeds or plant the seedlings, and in the strip in the middle - lay fresh manure. When it starts to decompose, additional substances will be released to feed the plants and heat. Upon completion of all work, the walls from the outside should be covered with earth to the top level and pulled with polyethylene film or covered with glass.
The simple design of the recessed greenhouse forces you to choose a dry place that is well lit and protected from the winds. Take into account the shadows that cast buildings and trees standing nearby. A ground greenhouse looks like an ordinary film cover of the soil in which seeds are sown or seedlings are planted. To ensure optimum temperature, you need to stretch the film as close as possible to the seedlings, but at the same time so as not to hinder their free growth. There are several types of ground greenhouses, which differ only in installation method, height and operational characteristics.
Consider the main ones:
- Arched - the easiest and most inexpensive greenhouse in constructional terms. The main drawback of such a structure is that the polyethylene film, whatever it is in quality, becomes unusable very quickly. This is due to its frequent folding and unfolding, because in the places of imposition on the frame is constantly formed bulges. Therefore, for these greenhouses get the cheapest film. Arched greenhouse consists of racks, stiffeners and longitudinal slats. Their sizes are selected taking into account the size of the arches of the frame and cover. Such a greenhouse can have different sizes, because everything depends on the length of the bed.
- Single pitch greenhouse design, mainly used for growing seeds of root vegetable crops such as carrots, turnips and radishes. This simple greenhouse consists of three walls, which are located along the perimeter of the beds and film coating. The greenhouse is mounted as follows: first of all, a wall is placed, which is located along the bed. One edge of the polyethylene film is fastened to the upper face, and plugs made of any available material are placed on the sides, which press down its remaining free ends. After that, mount short side walls across the beds. Ultimately, around the perimeter of the lean-to greenhouse poured the ground.
- Greenhouse gable design consists of paired frames, tape-tied or glazed frames connected by canopies. To improve the insulation of the greenhouse, the joints between the paired frames and the ridge are covered with plastic strips. To facilitate access inside, instead of one of the frames set opening transom.
- Portable greenhouse probably the most convenient in terms of mounting design. The disadvantages include the fact that when disassembled, it takes up a lot of free space for storage. To build self-made portable greenhouses will not be difficult, especially if it is possible to build them from scrap materials. It is enough to find a box, attach a roof to it of any convenient form, and drag its frames with plastic wrap. Then, on the prepared site (cleared and leveled earth) the parts of the box are placed, which are fastened to each other with screws or bolts, and then the roof is installed on top. Another remarkable advantage of a portable greenhouse is that it can be changed annually, observing all the rules of crop rotation.


Did you know? In Iceland, the arrangement of greenhouses occurs on geysers.
Types of materials for the greenhouse
As a translucent material for covering greenhouses, you can use both glass and various polymeric materials. Glass is a fairly durable material, so glazed greenhouses serve for years, but the main drawback due to which it is not often used to create greenhouses is that it does not let the whole spectrum of sunlight, which is so necessary for growing vegetables. As a result, their taste is deteriorated, since the content of vitamin "C" is reduced. In addition, the glass is heavy and rather fragile. 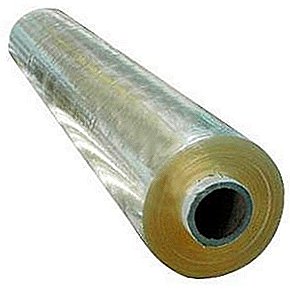 Of the materials of the lamellar polymer group, polyethylene film is most widely used, for the most part because of its low cost. In addition, it is easy to install and it passes the required amount of light. Also, such material is easily removed from any part of the frame, if you need to ventilate the greenhouse or harden the seedlings. The main disadvantage is the fragility, due to the weak strength of the material.
The remaining benefits of polyethylene films include:
- elasticity;
- frost resistance;
- high moisture resistance;
- good oxygen and carbon dioxide permeability;
- transmission of the entire spectrum of sunlight;
- good light scattering ability.
Polyvinyl chloride film is endowed with all the advantages of polyethylene film, besides it has a longer operating life, and among the shortcomings can be identified perhaps the low permeability of ultraviolet rays (about 20%). But, alas, this film has not gained popularity. Polyethylene and polyvinyl chloride materials reinforced with glass fiber serve up to 8 years and have a light transmittance of 75%.  The most common rigid polymer material is cellular polycarbonate. It may perhaps be called the golden mean, because it has all the advantages of glass and plastic film and is almost completely devoid of their shortcomings. At the price of cellular polycarbonate film is more expensive, but cheaper and lighter than glass. At the same time, it is much stronger, therefore more durable.
Advantages of cellular polycarbonate:
- high bandwidth of sunlight up to 86%, which over time can fall to a maximum of 82%;
- excellent light scattering ability, and this eliminates the occurrence of sunburn on plants;
- the operational period is 20 years;
- high impact strength of the material;
- excellent thermal insulation quality;
- good resistance to poor climatic conditions, with preservation of all properties at extreme temperatures from -40 ° C to + 120 ° C;
- light installation process due to low weight;
- good flexibility (from it you can make different designs for the roof).
 There are three types of polycarbonate covering material: budget, standard and premium. Budget class sheets have a lower density, they are thinner and they contain a larger amount of second-grade raw materials. They are cheaper, but the operational period is less. Standard sheets are 25 mm thick. On the one hand, they are covered with a protective material that protects the polycarbonate from the harmful effects of the environment. This polycarbonate has all the advantages that have been described above. It is manufactured in accordance with international quality standards. Premium-grade polycarbonate has a thickness of 4 to 30 mm and, unlike the standard class, the protective material on it lies on both sides.
Here are just the installation of premium polycarbonate will require some knowledge and skills from you:
- stiffeners must be mounted vertically to avoid condensation;
- polycarbonate must not be bent at a radius smaller than that specified by the manufacturer;
- the ends of the panels before installation must be sealed;
- This material can only be cut with a small prong saw or a construction knife;
- polycarbonate is fixed with self-tapping screws with thermo washers;
- the construction of a greenhouse made by hand does not imply the installation of polycarbonate material at temperatures below + 10 ° C;
- installation of polycarbonate should be carried out only overlap. It is strictly forbidden to mount it end-to-end.
Did you know? The Crystal Palace, was built in London in Xiv century. In this long-term greenhouse many festivals and events of various kinds were held, including the Queen’s receptions.
How to make a greenhouse with your own hands: step by step instructions and the necessary tools
In order for the results of the grown crop to meet your expectations, you need to think about where to put the greenhouse, what material to use during the installation and what plan to take when building the structure. All these issues need to be resolved before the start of construction.
How to make a greenhouse of the arcs?
After the arc and covering material is selected, you can start making a greenhouse with your own hands.
Frame assembly:
- Attach the arcs with staples to the base of the rails or bars, or stick to the ground.
- The distance between the arcs should not exceed one meter (optimally - 80 cm). Otherwise, the stability of the frame will be at risk.
- The top of the greenhouse must be "tied" reinforcement to give the structure strength. You can use PVC pipes of the desired size.
Important! Cover a greenhouse of arcs with a film at full length so that it reaches the ground from the end. It is necessary that the wind did not fall inside and did not completely destroy the greenhouse.
If you cover the frame with inexpensive plastic wrap, then on the sides it can be pressed down to the ground with available materials. More expensive types of covering material will need to be attached with special brackets to the ground, or to the base of the arcs.
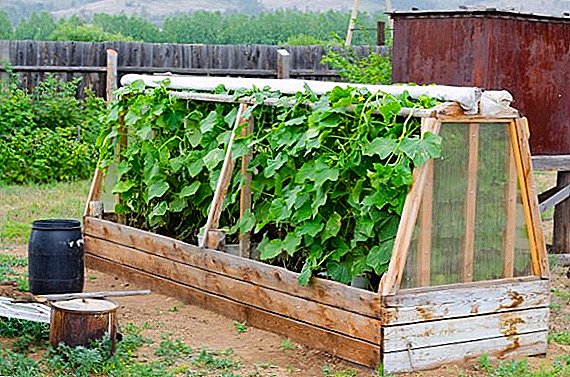
How to make a greenhouse of wood?
Greenhouses made of wood, which are made by lovers by gardeners, are the most convenient in mastering the first steps in growing plants. They are made collapsible for easy reuse next year. To make a wooden greenhouse with minimal financial costs is much easier than it might seem at first glance.
Portable greenhouse
 Even an inexperienced gardener can make a small arched greenhouse of a portable type with his own hands. Small sizes limit the full care of vegetables, if you are inside it, so you have to remove the coating by half for irrigation, weeding and other work. The greenhouse film comes into disrepair very quickly, so it is better to work a little more and design a greenhouse in the form of a box. Such greenhouses can also have transparent walls, not only the roof. To do this, you need to collect a few wooden frames and fasten them together. For ease of access, it is better to make the roof foldable on its hinges and be equipped with a latch so that it does not open due to strong wind gusts.
Important! In order for such a greenhouse to last longer, install it on an improvised brick foundation. If you use the bars, they will need to be impregnated with a special compound that will prevent rotting.
Stationary greenhouse
Stationary greenhouses for summer cottages, which are built with their own hands, require the laying of a capital foundation. It can be built from old bricks on a solution of cement, which is a more budget option. You can also use ready-made concrete blocks or pour mortar by exposing the formwork. The next stage is the construction strapping. Along the perimeter of the foundation, lay a wooden bar with a section of 10x15 cm up. The bars can be fastened in any way: "dovetail tail", "in the floor of the tree", on the anchor, or by mechanical overlays.
Important! Any greenhouse should have the possibility of airing. Great for this is the hinged mounting of frames or the easy possibility of removing the cover material.
 A wooden crate is attached to the tied bars, which consists of vertical posts and horizontal bars in increments of one meter maximum. If you organize a film coating, you can stretch it over the frame, fixing it on the extreme slats, or create modules from old window frames with a film instead of glass, which are combined into one continuous structure. The roof can be any, but always with a slope, even the smallest, which will ensure the flow of precipitation. Inside the greenhouse, you can dig a shallow trench in the length of the whole structure, which is filled with fertilizer, and then sprinkled with a powerful soil layer. A strong layer of soil will protect the deep roots of the plant from burns (30 cm in height will be optimal).
Did you know? In northern countries, greenhouses and greenhouses are often attached to houses. Thus, it is convenient to take care of plants at the same time and heat the house.
How to make a greenhouse of old windows?
In order to make a small greenhouse of the old window frames with your own hands, you will need the following materials:
- window frames in the quantity you need;
- several long boards, not thick logs or bars;
- old brick or concrete under the foundation;
- fastening elements for connecting the frames to each other.
When the material to create a greenhouse will be selected, you should more accurately determine its size. There is no such thing as an optimal greenhouse length, since it will depend on the size of the window frames and their number.
Important! Do not construct too large greenhouse, because it will not be not so convenient in operational terms.
 Before starting to assemble the structure, make sure that all the frames are matched to the same size. Adjust the boards and boards to the necessary requirements and promazhite bitumen mastic or used engine oil. Lay bricks around the perimeter of the future structure and lay bars on them. From the inside to the timber vertically attach the boards with screws. The distance between them should be made slightly smaller than the width of the frames. At the top, on the outside, attach the new boards so that the top edge of the first fully coincides with the vertical ends. After, to the ends you need to attach the rafters "house". This form is necessary, as we have already discussed, for the normal flow of precipitation. Attach the window frames to the finished frame, using the same screws for this.
Important! Как минимум, одна из рам парника должна открываться, поэтому с одной стороны ее необходимо посадить на петли, а с другой - закрепить шпингалетом.
Конструируем металлический парник
 A greenhouse frame made of a profile pipe is the most durable and reliable structure of all known types of shelters for the cultivation of early vegetable, berry and flower crops. To construct a mini or large greenhouse cottage from metal profiles, you need to take a fairly powerful pipe. Ideal profile 40x20 mm. To connect the frame horizontally, a pipe with a cross section of 20x20 mm will be sufficient. Prior to the acquisition of covering materials, to create a future framework, it is necessary to plan the drawing of the future greenhouse. This will help you in more accurate miscalculations of the amount of materials required. It will also significantly reduce the time and metal loss during cutting. Next, we take a closer look at how to make a metal mini greenhouse with your own hands with the simplest gable roof.
First of all, decide on how the foundation of your future greenhouse will look constructive. Here you can choose from several options, starting with wooden railway sleepers and ending with screw piles. In this example, we will consider a small monolithic foundation, with a depth of 30-40 cm. Before pouring the excavated trench, lay an anchor around the entire perimeter for the future fastening of the pipe. As soon as these parts grab, weld a 40x20 mm profile pipe to them, which will serve as a reliable basis for fixing all future frame frames of your metal greenhouse.  To avoid any distortions during the assembly of frames, the collection should be carried out on a flat and hard surface. If there is one, then it should mark the contour of the future frame and cut a profile pipe along it. To simplify the assembly process, it is not necessary to cut the profile into separate parts, it is better to make small accurate cuts with a grinder, and then gradually bend the pipe. Thus, the frame should be the desired shape. Exactly calculate the corners of the cuts so that the sections of the pipes during the bends join tightly and precisely. After that, carefully weld all joints. Structures, which should be approached with the utmost responsibility, are end frames. An entrance door will be installed in one of them, and a window leaf in the other.
If you plan to make a mini greenhouse, then the door can be excluded. Place these elements on the hinges directly on the frame when it is still on the assembly site, since the additional weight will make installation more difficult. Profile 40x20 mm has a sufficiently high rigidity, so the frame frame can be put through every meter.  Between themselves, they need to connect the segments of the square profile 20x20 mm. Install the frame elements with the end frame. So that it does not deviate from the vertical position, it must be fixed with two braces of the corner, welding them to the horizontal foundation pipe. Weld the horizontal connecting elements of the profile 10 cm below the inflection point of the frame. This is necessary in order to be able to attach the most convenient polycarbonate in width and length.
When the frame is finished welding, you should proceed with the installation of polycarbonate sheets. They are fastened to the profile tube with 3.2x25 mm self-tapping screws with press washers or special fasteners for polycarbonate. All sheets must be installed butt-face up. Protect the ends of the sheets with a high-quality silicone-based sealant or install a special protective plastic profile. The length of the roof sheet should protrude beyond the profile by 10 cm, thus forming a ramp. Polycarbonate is attached to the door and window leaf in the same way as to the walls. Only you need to choose the appropriate size so that it does not interfere with opening the greenhouse.