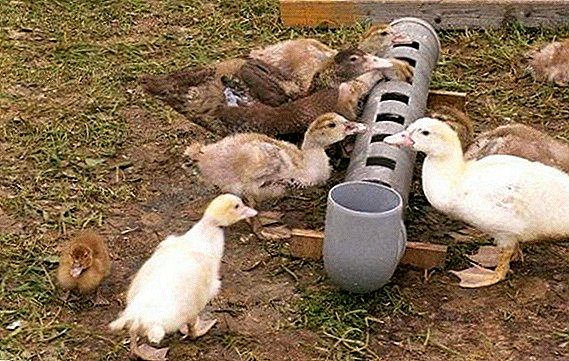
When breeding poultry one of the most important issues is the arrangement of feeders and drinkers. These devices should be as comfortable as possible and fully meet the needs of the birds in feed and water. In this article, we will look at several functional options for self-creating duck drinkers, and you don’t need any special materials or tools to implement this idea.
General Requirements for Duck Drinkers
Before proceeding to work on the creation of water tanks, it is important to know about the requirements for such a design and some of the nuances of its installation. 
First of all it is important to consider the following points:
- number of livestock: the number of drinkers will depend on the number of birds, their depth and size: each bird should have unhindered access to water at any time;
- design features of the drinker: both adult ducks and youngsters are very fond of water, therefore, so that they can completely lower their heads under it, it is better to make the containers deep and rather narrow;
- comfort of cleaning: if necessary, the components of the drinker should be easily removed so that the poultry farmer can wash it and disinfect it;
- automatic water supply system: this is an optional, but very convenient addition, especially when keeping large numbers of poultry;
- good stability of the structure and protection against spillage of water: usually the lower part of all drinking bowls is either fixed to the floor, or the container is attached to the wall on one side.
Did you know? Hunting for prey, wild ducks calmly dive to a depth of 6 meters. Poultry are also good swimmers, but they do not need to dive to such a depth.
All these requirements are relevant both when breeding small ducks, and when maintaining an adult herd, and the difference is only in the size of the troughs. 
Advantages and disadvantages of different types of drinking bowls
In the simplest version, the duck trough is an empty bucket or a deep bowl, at the bottom of which a stone is placed for stability. However, this solution cannot be called ideal, which means that it is worth exploring the pros and cons of alternative designs.
It will be useful for you to learn how to make a feeder for ducks, a nest and a shed with your own hands, as well as how to make various drinking bowls for ducklings with your own hands.
Deep water tank
The advantages of deep water tanks are as follows:
- availability (such "drinking bowls" will always be found at any hostess);
- ease of execution;
- ease of cleaning;
- possibility of replacement at any time.
As for the disadvantages of such tanks, it is:
- rapid contamination of clean fluid due to duck attempts to climb inside the tank;
- possibility of easy tipping drinkers;
- sprinkling of water in the process of watering, because of what in cold weather birds can catch a cold;
- the need for constant monitoring of the duck flock and frequent fluid changes.
 Ordinary bowls and small basins can still be used for small ducklings, but for older birds it is advisable to install a more convenient, but also a complicated version of the drinkers.
Vacuum
This type of drinkers received this name due to the principle of its work. The reduced pressure that forms between the water and the bottom of the inverted container does not allow the liquid to spill out (a vacuum is created).
This is another fairly simple solution to the question of the construction of the drinker, which also has its advantages and disadvantages.
Advantages of use include:
- availability of materials (all you need is a plastic bottle and a shallow stand for it);
- usability (easy to fill and wash);
- the possibility of free movement on utyatniku.

The disadvantages of this solution are somewhat greater:
- the possibility of tipping with a decrease in water, and therefore the need for additional strengthening;
- inability to dip the head, which is very important for ducks;
- high probability of splashing, and as a result - a disease of birds due to movement on wet soil;
- rapid fluid contamination and frequent water changes.
Did you know? Even with long bathing and diving under water, duck feathers remain dry, due to their lubrication with a special secret released from the base of the tail feathers.
The vacuum system is well suited for use in breeding ducklings, but it is desirable for adult birds to prepare a more durable construction. 
Nipple
Nipple types of drinkers are the most difficult of all presented, and for organizing water supply you will have to buy or make a special device. Recently, such drinkers are becoming more common, and there are many reasons for this.
Among the advantages of the design are:
- the convenience of use;
- the constant availability of clean water;
- fluid savings due to batch feed;
- the possibility of a ready purchase of the nipple mechanism or its independent construction;
- constant dryness of the floor in the duckling.
The disadvantages of nipple drinkers include:
- comparative high cost of materials;
- the complexity of self-collecting designs.
 Nipple drinkers are equally well suited for ducklings as well as for adult ducks, however, when constructing them, it is important to take into account the size of the bird in order to calculate the optimal amount of liquid supplied.
Groove
Another good option for water supply. In its simplest form, this is a regular plastic pipe (often used by plumbers), in which on one side there are holes cut corresponding to the size of the bird’s head.
It will also be useful for you to learn about the peculiarities of keeping at home such popular duck breeds as ogar, gray Ukrainian, Cayuga, Bashkir, Peking, blue favorite.
The advantages of this solution include:
- ease of creation;
- availability of materials;
- greater capacity;
- durability of use.

The disadvantages of the flute system are:
- the need for good fixation (if the pipe turns upside down, there may be injuries to the ducks or just the whole floor in the duck will become wet and damp, which is also extremely undesirable);
- frequent replacement of water, especially when large poultry population is maintained (each of them will constantly wash the beak in the water);
- the difficulty of replacing water: together with a liquid, this design is very heavy, and therefore, to replace water, you need the power of two people.
Important! Choosing a pipe to create a chute drinker, pay attention to the strength of the product so that it does not crack after the first installation manipulations.
How to make drinking bowls for ducks do it yourself
If you have already chosen the most suitable option for the construction of a duck drinker, then it remains only to carefully study the phased process of its creation. Consider the above constructions from this point of view.
Chute Drinker from Sewer Pipe
Necessary materials:
- plastic pipe (optimal length of 1.5 m, but depending on the size of the coop, you can take a longer product);
- plastic knee (turn signal);
- stub for one side;
- two wooden bars that will serve as a kind of legs on both sides.
Chop drinker from a pipe do it yourself: video
Required tools:
- jigsaw with small-toothed saw for metal and sawing on wood;
- a screwdriver with a drill for metal (needed to prepare holes before using the jigsaw);
- level (plays the role of a ruler when marking the pipe);
- marker.
The process of creating a flute drinker is as follows:
- We take the pipe, place it on the table and put the level on top (along the entire length).
- On both sides of it, we draw two lines along the marker (along) that will indicate the width of the future holes.
- Now we step back from the edge of the pipe 1 cm and begin to mark the border of future holes along the length with the remaining islands between them (in order not to accidentally cut such an island, in this area you can put a cross on the marker). As soon as the marking is completed, you can proceed to the direct cutting of the holes.
- We take a drill and in each marked rectangle (for adult ducks its length can be 15-18 cm with a width of 8-10 cm) we drill two holes diagonally (at the corners).
- Insert the jigsaw nail file into the hole and cut a rectangle according to the drawing.
- Similarly, we make holes in other places.
- We make legs for the finished pipe from wooden bars (using a jigsaw, we cut a hole in the wood that corresponds to the width of the pipe).
- We assemble the structure by closing one side with a cap, putting the knee on the other and placing the pipe on the stand.


Important! For better stability of the drinker, you can use more bars, placing them not only on both sides, but also in the middle of the pipe. The plastic must fit tightly into the holes, so that the product does not turn.

Nipple Drinker
Necessary materials:
- nipples functioning from top to bottom (1800 for ducklings-teenagers or adult ducks and 3600 for small chicks);
- a square tube of 2.2 x 2.2 cm with slots inside it (when buying, be sure to take into account the length of the product, because there should be at least 30 cm between adjacent nipples);
- micro-bows under the nipples for collecting drops;
- silencer under the tube;
- an adapter that will connect the pipes;
- hose and vessel under the water (for example, a tank with a lid), if you do not plan to connect the system to a centralized water supply.
Find out what breeds of ducks belong to black and white ducks, to crested, and which - to meat.
Prepare from the tools:
- drill with a 9 mm drill bit;
- tap for conical thread;
- marker.
Nippelny drinking bowl for birds with their own hands: video
The procedure for performing all actions is as follows:
- We take the prepared pipe and mark the place for drilling holes under the nipple with a marker.
- We drill holes with a diameter of 9 mm and use a tapered tap to cut threads into them.
- Screw the purchased nipples each in its place.
- We take the prepared plastic tank with a lid and make a hole in its bottom, corresponding in size to the diameter of the hose to be connected.
- Then you can either cut the thread, or simply insert the hose into the hole of the tank and wrap it with Teflon tape (can be used to seal other possible places of water leakage).
- The second edge of the hoses is connected to a pipe with nipples.
- Under each of them, we fasten a micro bowl to collect water to the pipe.
- We fix the tube with nipples in the horizontal direction at a convenient height for the ducks.
- Above the pipe with nipples install the tank, for convenience, performing this work immediately in the room. If there is a possibility of freezing of water in the tank, then you will have to install an additional heater.
- By putting together all the elements, we get a finished teat drinker.


Of course, in comparison with the previous types of drinking troughs, nipple is the most difficult, but it is with its help that you save yourself from the need for frequent water changes and ensure dryness in the chicken, which is worth the effort.
Vacuum
For the construction of the most simple drinkers you will need:
- shallow tray with rims over the width of the bottle cork;
- plastic bottle;
- metal profile or wire frame
From the tools worth preparing:
- wire cutters;
- pliers;
- screws;
- drill with a small drill.

Creating a drinker involves the following actions:
- The frame for the bottle fastened with screws to the wall in the selected location.
- Pour water into the bottle and twist the neck with a lid.
- Install it in the frame neck down.
- We substitute a pallet under the bottle, only so that there is little space between the neck and the bottom.
- Open the lid and see how the required amount of water flows into the pan.
- Everything, the vacuum drinking bowl is ready, and as soon as the ducks drink some water from the bottom of the structure, it will immediately be filled with liquid from the bottle.
 By and large, any of these options is not very complex execution, but in a situation of choice, it is desirable to focus on personal circumstances.
So, for small ducklings, a vacuum drinker is more suitable, and when breeding a large number of ducks, it is advisable to install a nipple or groove structure that will cost a little less than the previous one.
In a word, with a little effort, you can create a drinker from the material at hand and save a certain amount of money.