Novice poultry farmers do not always pay due attention to providing their wards with water, considering this to be a matter that does not require special care. However, as practice shows, it is not enough just to pour water into any suitable container. Birds, and in particular quails, are so mobile and troublesome creatures that they very quickly contaminate it with food, feathers and excrement residues. And sometimes, in a completely innocuous-looking open tank, even the chicks drown, so you have to be responsible for creating bird feeders.
Drinker Requirements
In the process of keeping poultry, people have accumulated rich experience, on the basis of which certain requirements for drinking bowls have been developed:
- they should be kept as closed as possible to avoid contamination of water and the reproduction of harmful microorganisms in it;
- their size should clearly correspond to the number of birds served and their age;
- every bird should be maximally accessible to them;
- water should be accessible to birds of any height, so that each of them can reach it;
- the materials from which the drinkers are made must be environmentally friendly, hygienic and harmless to poultry;
- containers should be fixed in such a way that they can be easily removed for cleaning;
- the construction of the drinker should be durable and not dangerous for the bird.

Drinkers for quails with their own hands
There are four main types of structures that provide quail drinking:
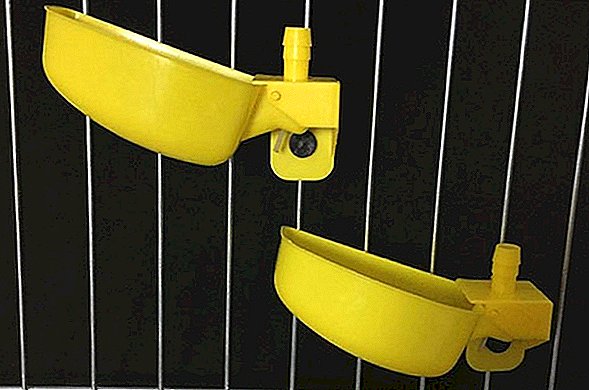
- Open type, for which almost any low capacity is suitable.
Did you know? The amazing health of quails that are insensitive to salmonellosis and other avian afflictions so that these birds do not require vaccination, due to the high temperature of their body, which simply kills harmful microorganisms.
This is the most unhygienic type of drinkers, which quickly pollute, splash and overturn and in which chicks drown.
- Vacuum based on the pressure difference in spheres located outside and inside the structure. Usually used in large poultry farms.
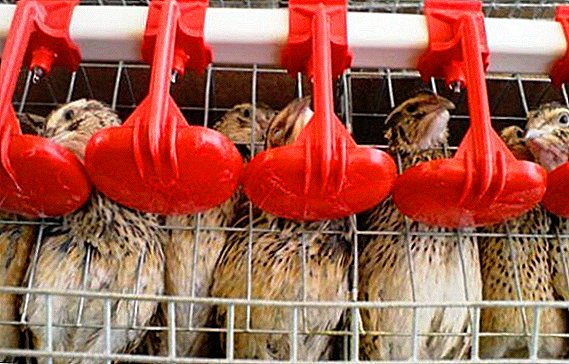
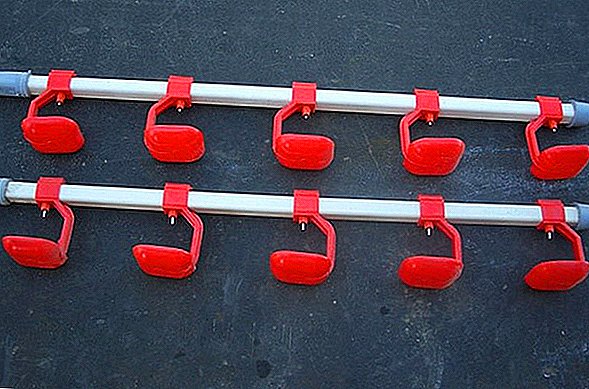
- Nipple, which are also called drip, acting on the principle of washstand. Water is supplied drop by drop after pressing the nipple tip with the beak of the quail.
- Cup, consisting of small plosek, water into which is supplied automatically through the valve as soon as the water level in such a drinker is reduced to a critical value.


All these types of drinkers are quite available for making their own hands. In addition, there are still numerous options for creative watering devices for poultry made by handy craftsmen from plastic bottles.
We advise you to read about how to make a feeder, brooder, cell and quail shed with your own hands.
Nippelny drinking bowl
To make this type of drinking device, you will need tools and materials in the form of:
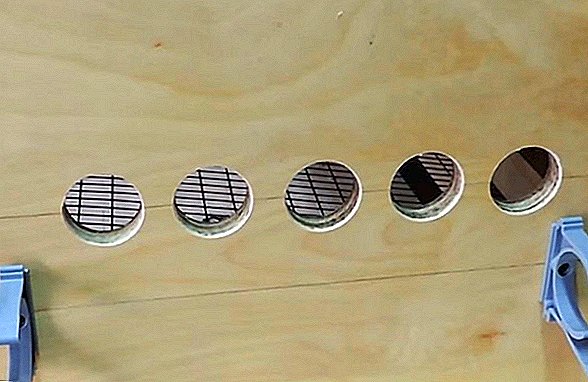
- nipple drinkers with drift eliminators;
- plastic pipe;
- plastic cap;
- couplings;
- choke;
- drills;
- drill diameter of 10 mm;
- plastic clamps.
To assemble a structure, you should:
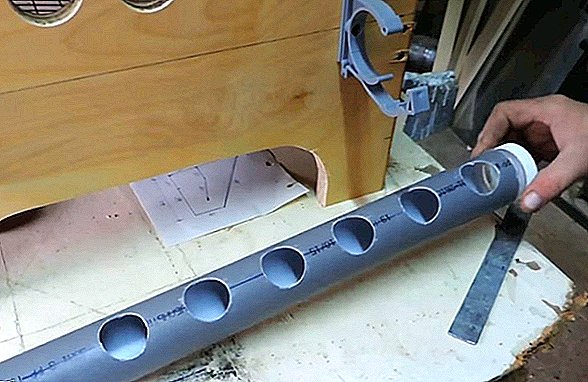
- Prepare meter section of plastic pipe with a diameter of 25 mm.
- Close one end of the pipe with a plastic plug.
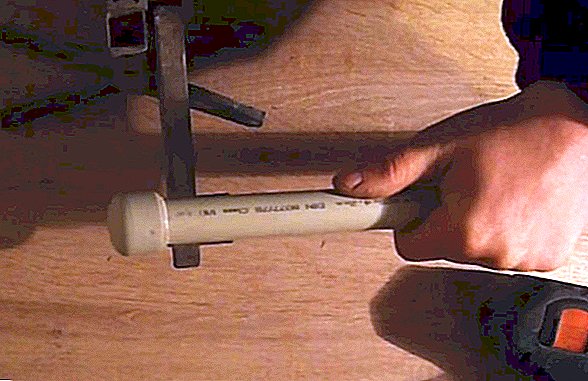
- Drill five holes at regular intervals along a horizontal line along the pipe.
- Remove the burrs with a knife around the holes and spill the chips through the open end of the pipe.
Did you know? Quail eggs can be safely stored at room temperature, without requiring refrigeration. In addition, they do not contain cholesterol and never cause allergies.
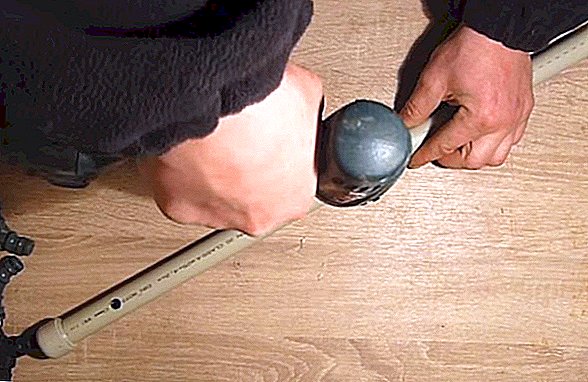
- To put on the open end of the pipe coupling.

- Tighten the coupling on the coupling.
We recommend reading about how to properly feed quails and quails, when there is a period of egg production at quails, how many eggs a quail carries per day, and also how to keep laying quails at home.
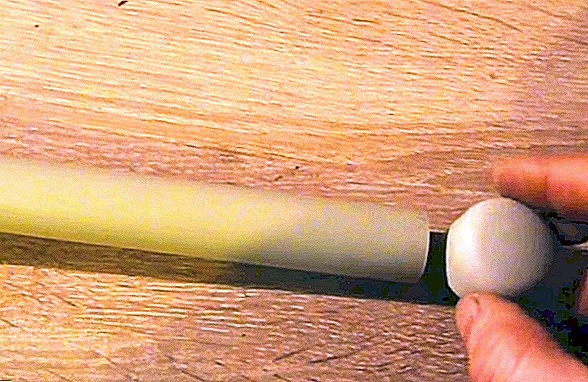
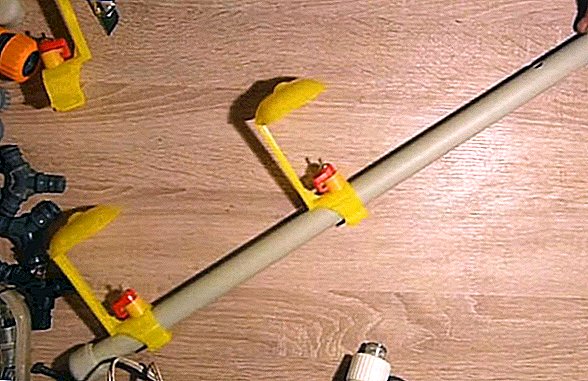
- Put on the drilled holes of the factory-made nipple drinkers, combining the projections surrounded by the gaskets with the holes on the pipe. Collars on drinking bowls, covering the pipe from two sides, snap.
- In the upper far corner of the bird cage, cut a hole.

- The resulting construction of the pipe shove into the cell through the door in it and bring the end of the pipe with the fitting out.

- Using plastic clamps to attach the drinking structure of the pipe in a horizontal position to the ceiling of the cage.
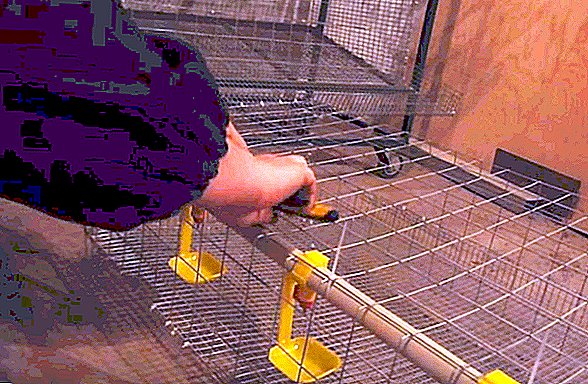
- Connect the hose to the water supply to the fitting.


Important! In no case should not combine a feeding trough and a drinking bowl in one complex or even to place them nearby.
Vacuum Trough
For the manufacture of vacuum drinkers with their own hands are needed:
- plastic pipe with a diameter of 50 mm;
- plywood sheet;
- a mill with a diameter of 32 mm;
- milling cutter with a diameter of 44 mm;
- drill;
- two necks with covers from five-liter plastic containers;
- sanitary fixings;
- plastic bottle with a capacity of 1 l;
- narrow metal plate with a length of 20 cm;
- self-tapping screw 45 mm long.
This quail watering machine is assembled as follows:
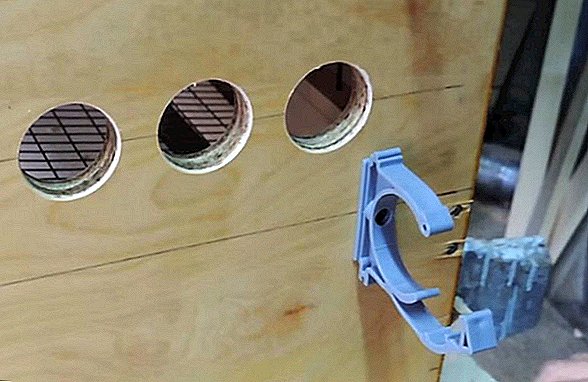
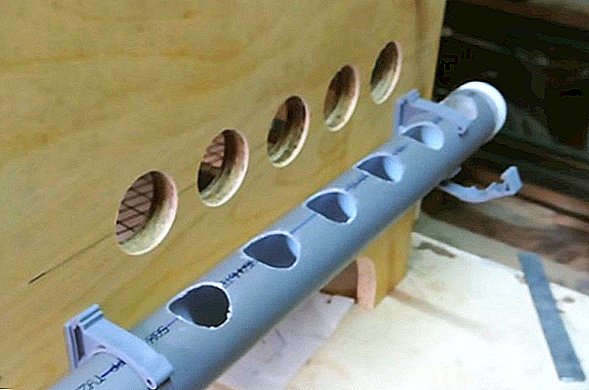
- In the plywood sheet, which covers the front of the cage with birds, in the lower part of the cage are drilled with a diameter of 44 mm five holes.
- In a plastic pipe, the length of which should correspond to the width of the cage with a bird, six holes are drilled along the vertical line with a cutter, five of which should be aligned with the holes in the plywood. That is, a quail, thrusting its head into the hole in the plywood, must easily reach the hole in the pipe.
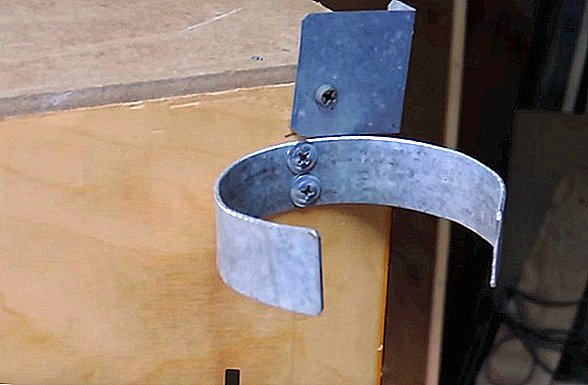
- Ten millimeters below the holes in the plywood on the sides of it reinforced plastic plumbing brackets that will support the pipe.
- A narrow metal plate is bent in the shape of a liter plastic bottle and then nailed to the plywood in the upper right corner in the center. This will be the top bottle holder.
- Then in both ends of the pipe should solder the neck of the five-liter plastic containers. Covers are screwed on these necks, which serve as a kind of pipe plugs. The advantage of this kind of plugs is the ability to unscrew them and then flush the inside of the pipe.
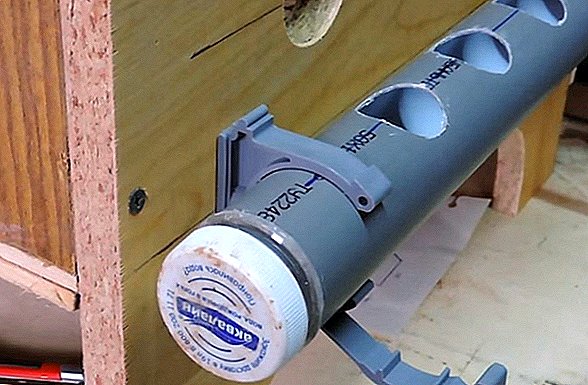
- The prepared tube is inserted into the fixture in such a way that the five holes on the left in it coincide with the holes in the plywood, and the sixth hole on the right is intended for the neck of a liter bottle.
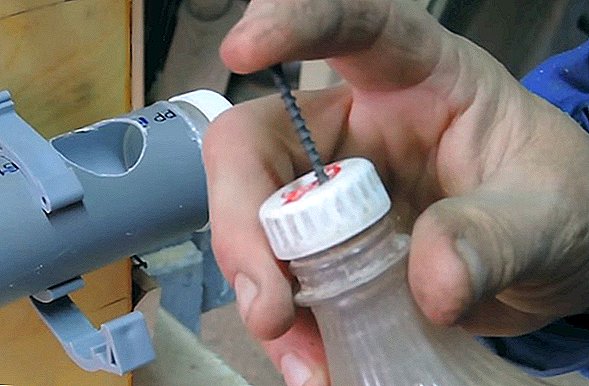
- Meanwhile, a five-millimeter hole is drilled in the lid of a liter bottle.
It will be useful for you to read about the best breeds of quails, as well as the most important thing in breeding quails at home.
- A screw with a length of 45 mm is screwed on from the outside of the lid. It is screwed to the minimum depth in order only to keep it in the cap. This screw, on the one hand, is a support for the bottle, and on the other - a kind of regulator of the height of the neck of the bottle in the tube.
- Then the bottle is mounted "upside down" in the holder and in the sixth hole of the pipe. At this assembly of the vacuum unit for watering quail ends.
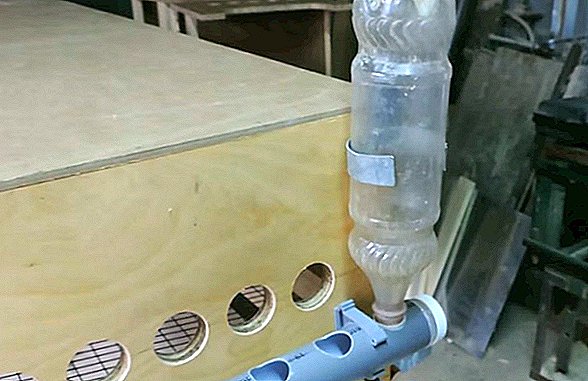
- Water is poured into the pipe and into the bottle. As the birds drink water in the pipe and lower its level there, the liquid automatically begins to flow from the bottle. The effect is built on the resulting pressure differences in the tube and bottle.


From plastic bottle
Many designs of drinking bowls on the basis of ordinary plastic bottles are the fruit of the engineering ingenuity of folk craftsmen and are often examples of ingenious solutions. All these designs are notable for low cost, simplicity of manufacture, excellent functionality and reliability.
Check out the advantages and disadvantages of keeping chickens together with quails.For example, one of the most popular designs based on plastic bottles is done like this:
- Two liter plastic bottles are taken.
- One of them is cut in half in cross section.
- In the lower part, at a height of 5 cm from the bottom, two holes are cut in the walls on opposite sides of them so large that a quail head passes freely in them.
- In the second bottle, a pair of small holes are made near the threaded neck.
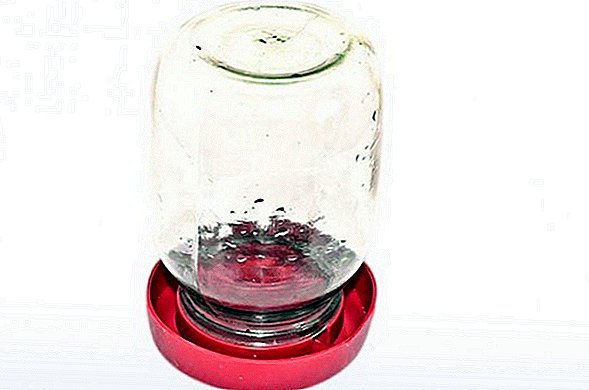
- This bottle with the cap screwed down is inserted into the bottom of the first bottle with the neck down, and the drinking bowl is ready.
- Now if water is poured into the top bottle, it will be poured from the small holes into the bottom until the water level reaches the holes on the top neck. Then the water supply will stop. But as soon as the quails begin to drink from the bottom of the bottle, lowering the water level in it, water will immediately start flowing from the top of the bottle again. That is, this is a simplified and extremely cheap version of a vacuum drinker.
- You can make a nipple drinker from a plastic bottle, cut off the bottom of the container and insert a nipple into its lid, adding a drop catcher to it, if desired.

Tips
Experienced poultry farmers when growing quails recommend:
- quips must always have access to fresh water;
- the water entering the drinkers should not be cold;
- at least three times daily quail water should be changed;
- twice a month the drinkers must be disinfected;
- in order to carry out high-quality sanitization, it is necessary to add five liters of water to a kilogram of ash, boil the solution, and then dilute it in two buckets of water.

The quality of water supplied to poultry depends not only on the condition of the water source, but also on the design of the drinker through which the quails directly receive it.
Important! If you have to use open tanks for watering the birds, they should not be made deep to avoid accidents with chicks.Today, the abundance of materials and available design solutions allow a home master to quite easily build an inexpensive but effective watering can for their feathered pets with their own hands.